Showing posts with label how-to. Show all posts

Tuesday, November 2, 2021

Shrinky dinks

Shrinky Dinks can be made from #6 plastic.  #6 plastic is the classification for Polystyrene (aka Styrofoam). When you think Styrofoam you’re likely thinking of disposable cups or take out containers.  This is NOT what you want to use for this project!  While Polystyrene is used to make the items I just mentioned, the same type of plastic is used to make clear containers that are cheap, lightweight, and easily formed into shapes.  You frequently see them as take out containers for salads or lids for pans made out of aluminum.  These are types of plastic we want to use for this project.  Polystyrene is actually quite difficult to recycle, so reusing it for a project like this is a great way to keep it out of landfills!  

When using recycled #6 plastic, you’re likely to only find smooth surfaces (the kits on Amazon have a rough side and a smooth side) That’s why you’ll need permanent markers for this project.You’ll get a much better result using a permanent marker on the plastic than any other type of medium.  Make sure your plastic is really clean and dry before getting started, especially if you’re using old take out containers. You can simply wash them with dish soap and water.  ou’ll need a good pair of scissors to cut out your shapes and you can also use a hole puncher if you’re planning to make your DIY shrinky dinks into charms. You’ll also need parchment paper so the plastic won’t stick to the sheet pan you’ll bake them on.  

Now for the fun!  You can draw whatever you want.  You can even trace designs since the plastic is clear. Also remember that the plastic will shrink up to about 1/3 the original size of the designs. If you plan to make it into a charm, it’s a good idea to use a hole puncher to put a hole in the plastic before you shrink it.  It will be impossible to do once you’ve baked your DIY Shrinky Dink. Once you’ve colored in your designs, cut them out. 

Now you’ll want to arrange your designs on a sheet pan, with a sheet of parchment paper underneath them.  This will keep your dinks from sticking to your pan and ruining it.  You’ll need to preheat your oven to 350 degrees.  Once the oven reaches temperature, place your sheet pan on the middle rack. It won’t take very long for them to shrink up, only about 2 to 3 minutes, so I DO NOT recommend walking away from your oven.  Don’t freak out if your designs start to curl up.  That’s perfectly normal.  They’ll uncurl again.  Once your designs have uncurled and are flat again, they won’t shrink anymore, so you can take it out of the oven.   Be super careful, since they’ll be hot.  You’ll want to let the cool for a few minutes before trying to handle them.

Thursday, February 19, 2015

Home Made Yogurt


1 quart (1 l) whole milk
1/4 cup (60 g) plain whole milk yogurt

1. Clean a 1 quart  jar by pouring boiling water in it and letting it stand 5 minutes. Drain the water (carefully, as the water and the jar will be hot), and let the jar dry.

2. Heat the milk in a saucepan fitted with a thermometer, or use an instant read thermometer, until the milk reaches 180ºF (82ºC). Remove from heat.

3. When the temperature drops to 115ºF (45ºC), stir in the 1/4 cup of yogurt, then pour the mixture into the jar and cover it.

4. Put the yogurt in a slightly warm place, and leave it undisturbed for 10 to 12 hours. The longer fermentation will yield a more tart yogurt.

5. Chill the yogurt thoroughly, at least three hours. The yogurt will thicken up once cool.


Saturday, February 7, 2015

Sweet Tofu Pockets

I wanted to make tofu pockets, but to do that I need bean pockets to stuff.  You can buy them or try to make them from scratch.  I am going to try to make them from scratch.

Abura-age (tofu pocket)
1 block extra firm tofu

Cut into thin even slices (I cut mine the width of a chop stick). Arrange slices on a double thick square of paper towel.  Place another double thick topping of paper towel on the tofu slices. Set a cutting board or a cookie sheet on your  tofu sandwich and add a few cans of beans or something to weigh down the cookie sheet.  Press out the water for 2 hours.  Change paper towels as they become saturated with soy bean water. Remove weighs and allow to air dry for 1 hour. You want really dry tofu.
To test, fry one slice for 5 minutes in low temperature (about 110℃). If the tofu has been drained well, it should ideally spread about 1.5 times its original size. If it doesn't, then the draining wasn't enough. If this is the case, use the tofu for some other dish. Mine shrunk, but I pressed forward anyhow.
Drain any excess oil, and fry again in medium temperature (about 160℃). The fried abura-age are quite firm immediately after they've been fried a second time. Wrap them up in plastic wrap, and microwave until the inside of the microwave turns white with steam (600 watts for 45 seconds). Cut pockets open.
When abura-age is cooked in dashi stock seasoned with sugar and soy sauce they are nick-named inari-age or sushi-age because they are used for inari sushi.

Inarizushi (tofu pouch filled with rice)
Marinade for 6 - 10 pieces:
1 C. dashi or just water
1 Tb. sugar
2 tsp. mirin
2 tsp. soy sauce
1 shot of sake if you have

In principle, the marinade is similar to the teriyaki sauce. Whether you use water, dashi, or saki, aim for a sweet , spicy marinade. The amount of marinade should be so much that it covers the abura-age bags at least half (similar to teriyaki). Somebody else's how-to.

Wednesday, January 15, 2014

Paper flower

I found a great tutorial on-line how to make paper flower ornaments. I've seen them made with oragami paper, pages of books, and newspaper. I used my Food Network magazines (yum!). It yielded some lovely colors.

Sunday, August 4, 2013

DIY Sprinkles


ChocolateColored
1/2 C. powdered sugar1 C. powdered sugar
3 Tb. cocoa powder1/2 tsp salt
4 teaspoons vanilla infused vodka1 egg white
2 teaspoons water1 tsp flavor extract
(Just be sure it's 6 tsp. liquid, total)          food coloring

Instructions:
1. Mix powdered sugar with cocoa (for Chocolate) or salt (for Colored) very well. Add the liquid and mix, incorporating everything. You'll get a thick but workable frosting like mixture.
2. If you want to create multiple colors, distribute white frosting between separate bowls. Now add the food coloring. I recommend that you add between 2-3 drops of color, then whisking together, before add more. Continue until you’ve reached your desired color. Put your icing into a plastic sandwich bag, removing as much air as possible, then tying shut. With a scissors, snip a tiny, tiny hole into one corner of the bag. Or use a pastry bag with a #2 round tip.
4. Lay a piece of parchment paper down on a flat surface, then squeeze long straight lines of icing onto the parchment paper. Make sure the stripes don't touch.
5. Let dry up to 24 hours undisturbed. If you used mostly vodka as the liquid, this will dry faster, as it will if you live in a warm, non humid place. If you use water or your home is colder, this will take more time. Let it dry until you have hard sticks that flake off the parchment paper easily.
6. Pick up the side of the parchment paper, and start rolling it, so that the sprinkle sticks detach from the parchment paper and end up in the middle. Make a pile of all the sprinkle sticks, making sure they all are facing the same direction.
7. With a non serrated knife, cut the pile of sprinkle sticks into little sprinkles, each about a quarter of an inch long.
These now are your sprinkles. Use as you would any other sprinkles. Keep them in a dry place. They don't spoil.

Saturday, August 3, 2013

Monday, July 22, 2013

Tuesday, April 9, 2013

Opening a coconut


I swear I have posted this before, but I did remove a lot of content last year when my hard drive crashed and took my pictures with it.

5 ways to open a coconut

1. Martha Stewart.  Preheat oven to 400*. Place coconut inside for 10 mintues until outer shell is visably cracked.  Let cool.
2. Tap a tap  a tap.  Use a hammer to gently strike entire surface before delivering the opening blows. You can break the entire outer shell without damaging the meat.
3. Smash. Least preferred method. The meat stays glued to the husk.
4. Freeze.  First, freeze the coconut for day or overnight and then when ready to remove the meat, defrost the coconut and crack it open after it has fully defrosted. The meat can then be peeled away from the cracked husk. The dark skin can be removed by using a vegetable peeler or knife.
5. Boiling. Use a sharp knife to crack coconut in half.  Boiling the halves for about 5-10 minutes, then running them under some cold water and letting them sit for another 5-10 minutes. The softer flesh shrinks back to its original shape quicker than the harder shell and you can very easily slip in a knife or a spoon and pull the whole flesh out in one go.

Wednesday, March 13, 2013

Heating Pad

I found a nice tutorial via Pintrest the other day.  I was inspired to make my own rice bags.  This pattern makes two bags.  You will need 1/2 yard fabric, and 4 lbs rice. I used sandalwood, vanilla, and lavender essential oils to scent mine. It cost me $5.50 to make two.

Sunday, December 9, 2012

Door Swag


We got a lovely 4 ft Frasier Fir today. We needed to remove the bottom branches so it would fit in the tree holder. I used the discarded bows to make two door swags. Overlap several pine bows so they meet in the center. Use a zip tie to gather them together. Place a bow over the zip tie. Use a second tie to create a loop to hang your work of art.

Friday, July 27, 2012

No Mess Pastry Bag

You know I don't normally share videos, but this one was too good to miss! I actually said 'wow' while watching it.

Tuesday, July 17, 2012

Ice Cube Herbs

As 100* days persist, you'll likely find many of the herbs you planted maturing and dying. Save what you can by freezing them! The herb ice cubes work well for use in soups or in drinks, and an ice cube tray allows for smaller portioning of the preserved herbs.

  1. Wash the ice cube tray thoroughly to remove any contaminants that could affect the frozen herbs.
  2. Rinse the herbs you plan to freeze under cool water. Pat some of the moisture away with a paper towel.
  3. Trim off the leaves that you want to save. Snip the leaves into small pieces with clean kitchen scissors, or chop them with a knife.
  4. Fill each section of the ice cube tray with as many herbs as possible, then top off with water.  
  5. Freeze the herb cubes, making sure they are placed on a level spot in the freezer. You want the cubes to be frozen solid before removing them. 
  6. After the trays are fully frozen. Pop out the herb cubes and store in a freezer bag.  Be sure to label and date.
 Suggestions for herb combos: Stirfry, Chicken Soup, lemon ginger, wine garlic, lemon mint, herbs for pasta, tex mex, chilies, pesto, etc.


Sunday, April 15, 2012

Tamales


Step 1: Make the filling.
Step 2: Prepare the masa dough according to package directions.
Step 3: Spread dough on corn husk with a Tbs. of filling. Fold the tamale.
Step 4. Steam them for about an hour.

Sunday, September 18, 2011

Slip Covers for Pillows


I have a 14" pillow. So, I cut one 15"x15" pieces and two 10"X15" pieces. Tutorial can be found here. I added a ribbon for the middle instead of fringe. This is the fabric I am using to lengthen my curtains as well. I am calling the color evergreen.

Tuesday, August 30, 2011

Snozzberry Syrup


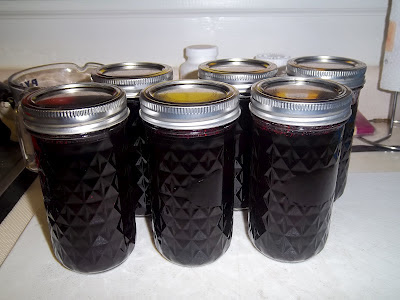
Hand pick your snozz berries for best results. Ideally, you will harvest them before they bloom. If the berries stay on the plant too long, they can dry up. Sort and rinse 7 pints of fruit. Carefully chop each berry into 18 pieces and boil them with the juice of 1 lemon for 5 minutes until they get soft. Pour fruit into a mesh strainer to separate the fruit from the juice. Press them if necessary but do not badger your fruit or it may spoil. You should get about 5 C. of liquid. Boil 7 C. sugar and 2 C. water to form a simple syrup. Add berry juice and boil (med-high) for 5 minutes. The syrup will have expanded to the top of the pot. Turn heat off and let cool. In your canning pot, boil enough water to come to the top of the jars (10 C. easily) and also boil your canning lids. Fill canning jars with syrup. Wipe rim of jar with clean paper towel, place a canning lid on top, fasten with screw-on band. Submerge jars into boiling pot of water, and boil for 10 minutes. Remove jars from water and let cool for a few hours. Jars are properly sealed when you hear them 'pop'.

Tuesday, March 15, 2011

Making Mead


Yield 1 gallon

3 1/4 lb Honey
7 pts Water
3 tsp Malic Acid
1 1/2 tsp Tartaric Acid
1/4 tsp Tannin
3/4 tsp Energizer
2 tablets Campden, crushed
1 package Sauternes yeast

1. Wash and drain containers. 2. In primary (container) dissolve honey in 1/2 gallon warm water with acid and tanning. Add remaining ingredients EXCEPT yeast. Cover primary. 3. After 24 hours add yeast. Cover primary. 4. Stir daily, check S.G. 5. When S.G. reaches 1.030 (5-6 days) siphon wine off sediment into glass secondary. Attach Airlock. 6. When ferment is complete (S.G. reaches 1.000) siphon off sediment into clean secondary. Reattach lock.

Tuesday, February 8, 2011

Petits Fours


Make pound cake in a jelly roll pan instead of a loaf pan. Slice pound cake in half like a sandwich, and fill with frosting or jelly. Make strips of cake, then slice into tiny squares. Dip squares in melted frosting or poured fondant. Set on silpat and let dry. Pop into freezer for a better setting on the chocolate.

Sunday, February 21, 2010

Hard Boiled Eggs

Yes, there is in fact a wrong way to hard-boil eggs. And the wrong way results in rubbery whites and yolks with that signature grey/brown coloring on the outside. Follow these simple steps to a perfectly cooked egg every time!


1. Place eggs in saucepan in a single layer.
2. Fill pan with cold water, covering eggs by 1 inch.
3. Place over medium-high heat. Cover; bring to a boil. When you see the water just starting to get tiny bubbles from the heat, add a spoonful of salt and place lid back on.
4. As soon as the eggs come to a rolling boil, turn off heat; let stand, covered (don't even think about peeking in there or you'll lose all of the heat), 12 minutes.
5. Transfer eggs to bowl of ice water. Let stand for about 5 minutes, then remove.